Night drone photography reveals an entirely different side of the world — one painted with artificial lights, long shadows, and a sky fading from deep blue to black. From glowing cityscapes and illuminated highways to seaside promenades and isolated mountains lit only by starlight, the results can be absolutely stunning. Yet shooting in extreme low light from a hovering platform introduces unique technical challenges. In this comprehensive guide, we cover every setting, technique, and piece of gear you need to consistently capture sharp, vivid night images with your drone.
📖 Read more: Photography Drones: The Complete Buying Guide 2026
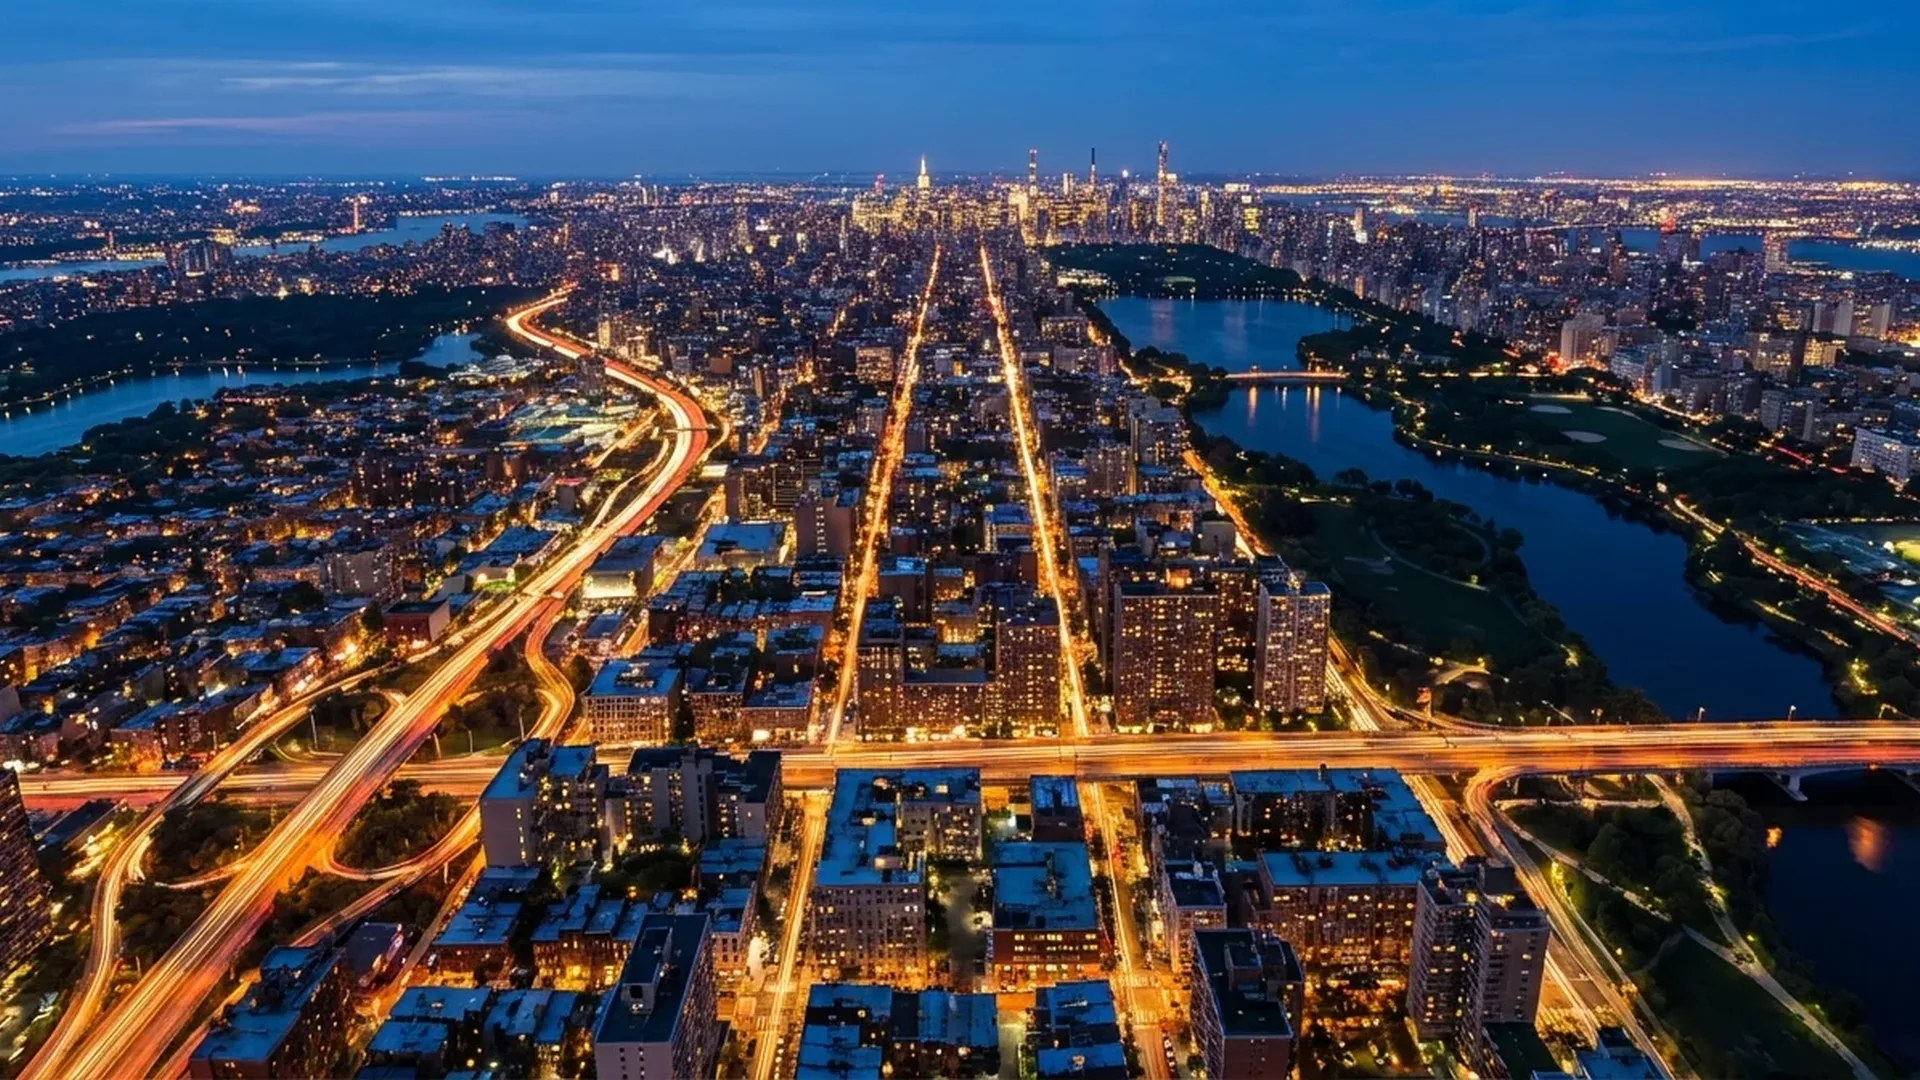
Why Night Aerial Photography Is Special
During the day, drone photography relies on abundant natural light and classic composition rules. Once the sun sets, everything changes. Colours shift, contrast increases dramatically, and artificial light sources — streetlamps, car headlights, building facades — become the main subjects. The aerial perspective adds the ability to reveal patterns invisible from the ground: the geometry of lit roads, the glow of neighbourhoods, the sharp contrast between illuminated and dark areas.
However, consumer drone sensors are significantly smaller than those in full-frame cameras, which means they collect less light and produce more noise at high ISO values. Additionally, drones cannot remain perfectly stationary — micro-vibrations and wind gusts can blur slow-shutter images. These two constraints shape every decision you will make, from camera settings to flight planning.
Camera Settings for Night Drone Photography
Getting the exposure triangle right is the single most important skill in night drone photography. Unlike daytime shooting where Auto mode often suffices, at night you need full manual control over ISO, shutter speed, and — if your drone supports it — aperture.
ISO: Keep It As Low As Possible
ISO determines sensor sensitivity to light. Higher ISO means brighter images but also more noise — and on small sensors, noise becomes problematic very quickly. On a modern drone like the DJI Mini 4 Pro with its 1/1.3-inch CMOS sensor and Dual Native ISO technology, results are usable up to about ISO 800 for stills and ISO 1600 for video. Beyond that, noise reduction in post-processing becomes mandatory.
- Photos: Start at ISO 100. Increase to 400 only if you cannot achieve an acceptable shutter speed. Avoid going above ISO 800 for 48MP shots or ISO 1600 for 12MP.
- Video (Night Mode): The DJI Mini 4 Pro's Night Mode supports ISO 100–12800 with an enhanced noise reduction algorithm that produces cleaner footage directly from the camera. Even so, ISO 800–1600 delivers the cleanest video results.
- Dual Native ISO: Some newer drones apply a second native ISO level (e.g., ~800) that provides a cleaner signal at higher sensitivities. Staying near this second native level often yields better results than, say, ISO 500.
Shutter Speed: Slow but Not Too Slow
Shutter speed is your primary tool for collecting enough light at night. Slower shutter speeds let in more light but increase the risk of motion blur from drone vibrations or wind.
- Native range: Most drones support shutter speeds from 1/16000 down to 2 seconds natively.
- Simulated long exposure: The DJI Mini 4 Pro can simulate exposures of 2.5, 3, 4, 5, 6, 7, and 8 seconds at 12MP resolution. The drone captures multiple shorter frames and merges them internally, greatly reducing the effect of vibrations.
- Practical guideline: For handheld-sharp results in calm wind, use 1–2 seconds. For light trails and silky water effects, use 4–8 seconds (simulated). Always enable Tripod Mode for exposures above 1 second.
Pro Tip: If your drone does not support simulated long exposure, bracket several 2-second shots and stack them in post-processing using software like Photoshop or Affinity Photo. This approach mimics a longer exposure while keeping individual frames sharp.
Aperture
Most consumer drones have a fixed aperture. The DJI Mini 4 Pro features a fixed f/1.7 lens — wide-open by default, which is advantageous at night since it collects maximum light. Higher-end models like the DJI Mavic 3 Pro offer adjustable apertures (f/2.8–f/11), giving you depth-of-field control. At night, keep the aperture as wide as possible — stopping down to f/5.6 or f/8 is counterproductive when you need every photon.
Blue Hour vs. Dead of Night
Not all “night” photography happens in full darkness. Understanding the difference between blue hour and true nighttime is critical for planning your shots.
Blue Hour (20–40 min After Sunset)
- ✅ Sky retains deep blue tones, not fully black
- ✅ Artificial lights are on, natural light remains
- ✅ Dynamic range is balanced — highlights and shadows coexist
- ✅ Lower ISO needed (100–400 typically)
- ✅ Obstacle sensors still functional (sufficient ambient lux)
- ✅ Best for cityscapes, waterfront scenes, landmarks
Dead of Night (90+ min After Sunset)
- ⚠️ Sky is completely black — no gradient
- ⚠️ Only artificial lights illuminate the scene
- ⚠️ Extreme dynamic range — blown highlights vs. pure black
- ⚠️ Higher ISO or very slow shutters required
- ⚠️ Obstacle sensors may not work (lux < 15)
- ⚠️ Best for light trails, star photography, abstract compositions
"The 20 minutes after sunset are worth more than 2 hours of pure darkness. Blue hour gives you the dynamic range that makes night images pop with detail in both the sky and the ground."
Tripod Mode: Your Essential Ally
Tripod Mode (available on most DJI drones) limits the aircraft's speed and dramatically reduces its response to wind gusts. In this mode, the drone hovers with maximum stability, which is critical for exposures of 1 second or longer. Without Tripod Mode, even gentle wind can cause micro-movements that show up as blur at 100% zoom.
To activate, switch to Manual (M) or Shutter Priority mode, then enable Tripod Mode from the flight settings. Frame your composition, set the exposure, and let the drone hover as still as possible before triggering the shutter. Use a 2–5 second timer or the DJI Fly app's remote shutter button to avoid vibrations from tapping the screen at the moment of capture.
Types of Night Shots
Night drone photography opens up creative possibilities that simply do not exist during daytime. Here are the most popular categories:
1. City Skylines & Urban Panoramas
The classic night shot. Find a vantage point above a city at blue hour, set ISO 100–400, shutter 1–2 seconds, and capture the grid of streets, lit buildings, and colourful signs. Urban areas provide abundant light, making them the most forgiving subject for beginners.
2. Light Trails from Traffic
Position the drone directly above or at a low angle to a busy highway. Use a 4–8 second simulated long exposure at ISO 100. Moving car headlights and tail lights create flowing red and white ribbons through the frame. The key is finding a road with consistent traffic flow and interesting curves or intersections.
3. Coastal & Waterfront Scenes
Water reflects light beautifully. Harbours with moored boats, waterfront restaurants with string lights, and promenades at twilight are ideal subjects. The reflection doubles the visual impact. A 2–4 second exposure will create subtle motion blur in the water, adding a dreamy quality.
4. Starry Skies & Astrophotography
This is the most challenging category. You need a location far from light pollution, very calm wind, and a drone capable of simulated long exposure (5–8 seconds). ISO 800–1600 with an 8-second exposure at f/1.7 can capture visible star fields above a dark landscape. Results won't match a dedicated camera on a tripod, but the aerial perspective combined with starlight is uniquely dramatic.
The 5 Most Common Night Photography Mistakes
Mistake #1: Cranking ISO Too High
Many beginners push ISO to 3200 or 6400 to get a bright image. On small drone sensors, this produces unacceptable noise. Instead, use a slower shutter speed and Tripod Mode. If you must raise ISO, keep it at 800 max for stills.
Mistake #2: Ignoring Wind
Wind is the enemy of sharp night shots. Even 10–15 km/h wind can cause visible blur at 2+ second exposures. Check wind conditions before flying, and postpone if gusts exceed 15 km/h. Always use Tripod Mode.
📖 Read more: Real Estate Drones: How They Transform Property Sales
Mistake #3: Forgetting Battery Impact
Cold night temperatures reduce battery capacity by 15–30%. A battery that lasts 34 minutes during the day may only give you 22–25 minutes at night. Always carry at least 2 extra batteries and warm them in your pockets before flight.
Mistake #4: Disabled Obstacle Sensing
Obstacle sensors need lux levels above ~15 to function. In deep darkness, your drone flies effectively blind. Set a minimum altitude of 30 m above the highest obstacle, maintain visual line of sight, and use the map view to track position.
Mistake #5: Shooting JPEG Instead of RAW. Night images require aggressive post-processing — noise reduction, shadow recovery, white balance correction. JPEG files lose critical data during compression. Always shoot RAW (DNG) for maximum editing flexibility.
Post-Processing Workflow for Night Shots
Even the best in-camera settings produce night RAW files that look dark and noisy. Post-processing is not optional — it is an integral part of the workflow.
- Import RAW (DNG) into Lightroom or Capture One — Enable lens correction and chromatic aberration removal.
- Set white balance — City lights often cast warm orange tones. Adjust to 3500–4500K for a neutral or slightly cool look.
- Lift shadows moderately — Pull the Shadows slider to +40/+60 to reveal detail in dark areas without lifting noise floor too much.
- Reduce highlights — Streetlamps and signs often blow out. Pull Highlights to -60/-80 to recover detail.
- Apply noise reduction — Use Luminance NR at 25–40 and Color NR at 25. For AI-powered solutions, DxO PureRAW or Topaz DeNoise AI deliver dramatically cleaner results than manual sliders.
- Boost clarity and vibrance — Clarity +15/+20 sharpens structural details. Vibrance +10/+15 enriches colours without oversaturating bright lights.
- Export at high quality — JPEG 95% quality for web, or 16-bit TIFF for further editing.
Recommended Drones for Night Photography
Not all drones perform equally in low light. Sensor size, aperture, and software features like Night Mode make a significant difference. Here are the best options currently available:
DJI Mini 4 Pro
Best compact option. 1/1.3-inch CMOS sensor with f/1.7 aperture and Dual Native ISO. Supports Night Shots video mode (ISO up to 12800 with enhanced noise reduction) and simulated long exposure up to 8 seconds. Under 249 g for simplified regulations.
Price: €700 (~$759) base | Fly More Combo RC 2: €1,010 (~$1,099)
DJI Air 3
Best mid-range choice. Dual-camera system with 1/1.3-inch wide-angle and 1/1.3-inch 3x telephoto. Dual Native ISO on both lenses providing excellent low-light performance. 48MP photos and 4K/60fps HDR video.
Price: €1,010 (~$1,099) base | Fly More Combo RC 2: €1,430 (~$1,549)
DJI Mavic 3 Pro
Best professional option. Triple-camera system with a massive 4/3 CMOS Hasselblad main sensor. Adjustable aperture f/2.8–f/11, native ISO 100–6400. Outstanding dynamic range and noise performance. Apple ProRes 422 HQ for maximum video flexibility.
Price: from €2,020 (~$2,199)
Best Locations for Night Drone Photography
Location choice can make or break a night shoot. Here are the characteristics to look for — and some specific examples:
- Cities with waterfront access: Thessaloniki's Nea Paralia, Athens' Stavros Niarchos Foundation Cultural Centre, Chania's Venetian Harbour — water reflections double the impact of lights.
- Hilltop viewpoints above cities: Lycabettus Hill (Athens), Ano Poli (Thessaloniki) — elevation provides dramatic panoramic perspectives.
- Infrastructure with traffic: National highways, bridges like the Rio-Antirrio Bridge, airport approaches — vehicle lights create flowing compositions.
- Islands and villages with low light pollution: Cycladic villages (Santorini caldera, Mykonos Chora) glow warmly against deep blue skies at dusk.
- Monuments and landmarks: The Acropolis, White Tower of Thessaloniki, Medieval Castle of Rhodes — architecturally spotlit structures look extraordinary from above.
Safety Considerations for Night Flights
Flying at night introduces serious safety risks that must be addressed before takeoff:
- Visual Line of Sight (VLOS): Maintaining VLOS is harder (and legally required) at night. Use the drone's position lights and anti-collision strobe to track its orientation. Consider adding a DJI Strobe light (approximately €35 / ~$38) for improved visibility.
- Obstacle sensors limited: Below approximately 15 lux, obstacle sensors cannot detect objects. Fly at safe altitudes, memorize the terrain during daylight reconnaissance, and avoid flying near trees, power lines, or structures.
- Battery warmth: Pre-warm batteries above 15°C before takeoff. Most DJI drones refuse to fly or limit power below 10°C. Intelligent batteries self-heat during flight, but starting warm extends usable capacity.
- Regulatory compliance: In many EU countries under EASA regulations, night flights in the Open Category (A1/A3) are permitted as long as you maintain VLOS with appropriate lighting. Check local NOTAMs and temporary flight restrictions before every session.
- Emergency landing planning: Choose your landing spot while there's still daylight. Mark it on the map in the DJI Fly app. A clear, flat area away from people is essential since you won't see ground obstacles clearly in the dark.
Night Video Mode: Cleaner Footage Straight from the Camera
Beyond photography, night video is increasingly practical. The DJI Mini 4 Pro's Night Shots video mode applies an enhanced noise reduction algorithm that "effectively suppresses noise and facilitates clearer, cleaner footage right from the camera." This means usable 4K video at ISO 3200–6400 in scenarios where older drones would produce unwatchable grain.
For professional results, shoot in D-Log M or HLG 10-bit colour mode. These flat profiles preserve maximum dynamic range and give you full control over colour grading in post. Use a 180° shutter rule: for 30fps, set shutter to 1/60; for 24fps, set to 1/50. If this results in an underexposed image, increase ISO gradually — the Night Mode algorithm handles noise better than you'd expect.
Smooth, slow gimbal movements work best at night. Fast pans smear point light sources. Plan your video compositions in advance: static shots of 10–15 seconds, slow reveals, and gentle orbits around illuminated subjects produce the most cinematic results.