What Exactly Is FPV?
FPV stands for “First Person View” — meaning you fly from a first-person perspective. Instead of watching your drone from the ground, you wear specialized goggles that show you in real-time exactly what the drone's camera sees. The experience is completely immersive — you feel as if you're flying through the air yourself.
Unlike traditional photography drones (e.g., DJI Mini, Air, Mavic) that fly steadily and move slowly, FPV drones give the pilot full manual control. There's no GPS hovering, no obstacle avoidance — just you, the sticks, and the adrenaline. This means the learning curve is steeper, but the satisfaction is immensely greater.
Important: FPV isn't only about racing (drone racing). There are three main categories of FPV flying: Freestyle (acrobatics and free-flowing flight), Cinematic (smooth, cinematic shots), and Racing (competitive speed races). Each category requires a different flying style and in some cases different equipment.
What Equipment Do You Need?
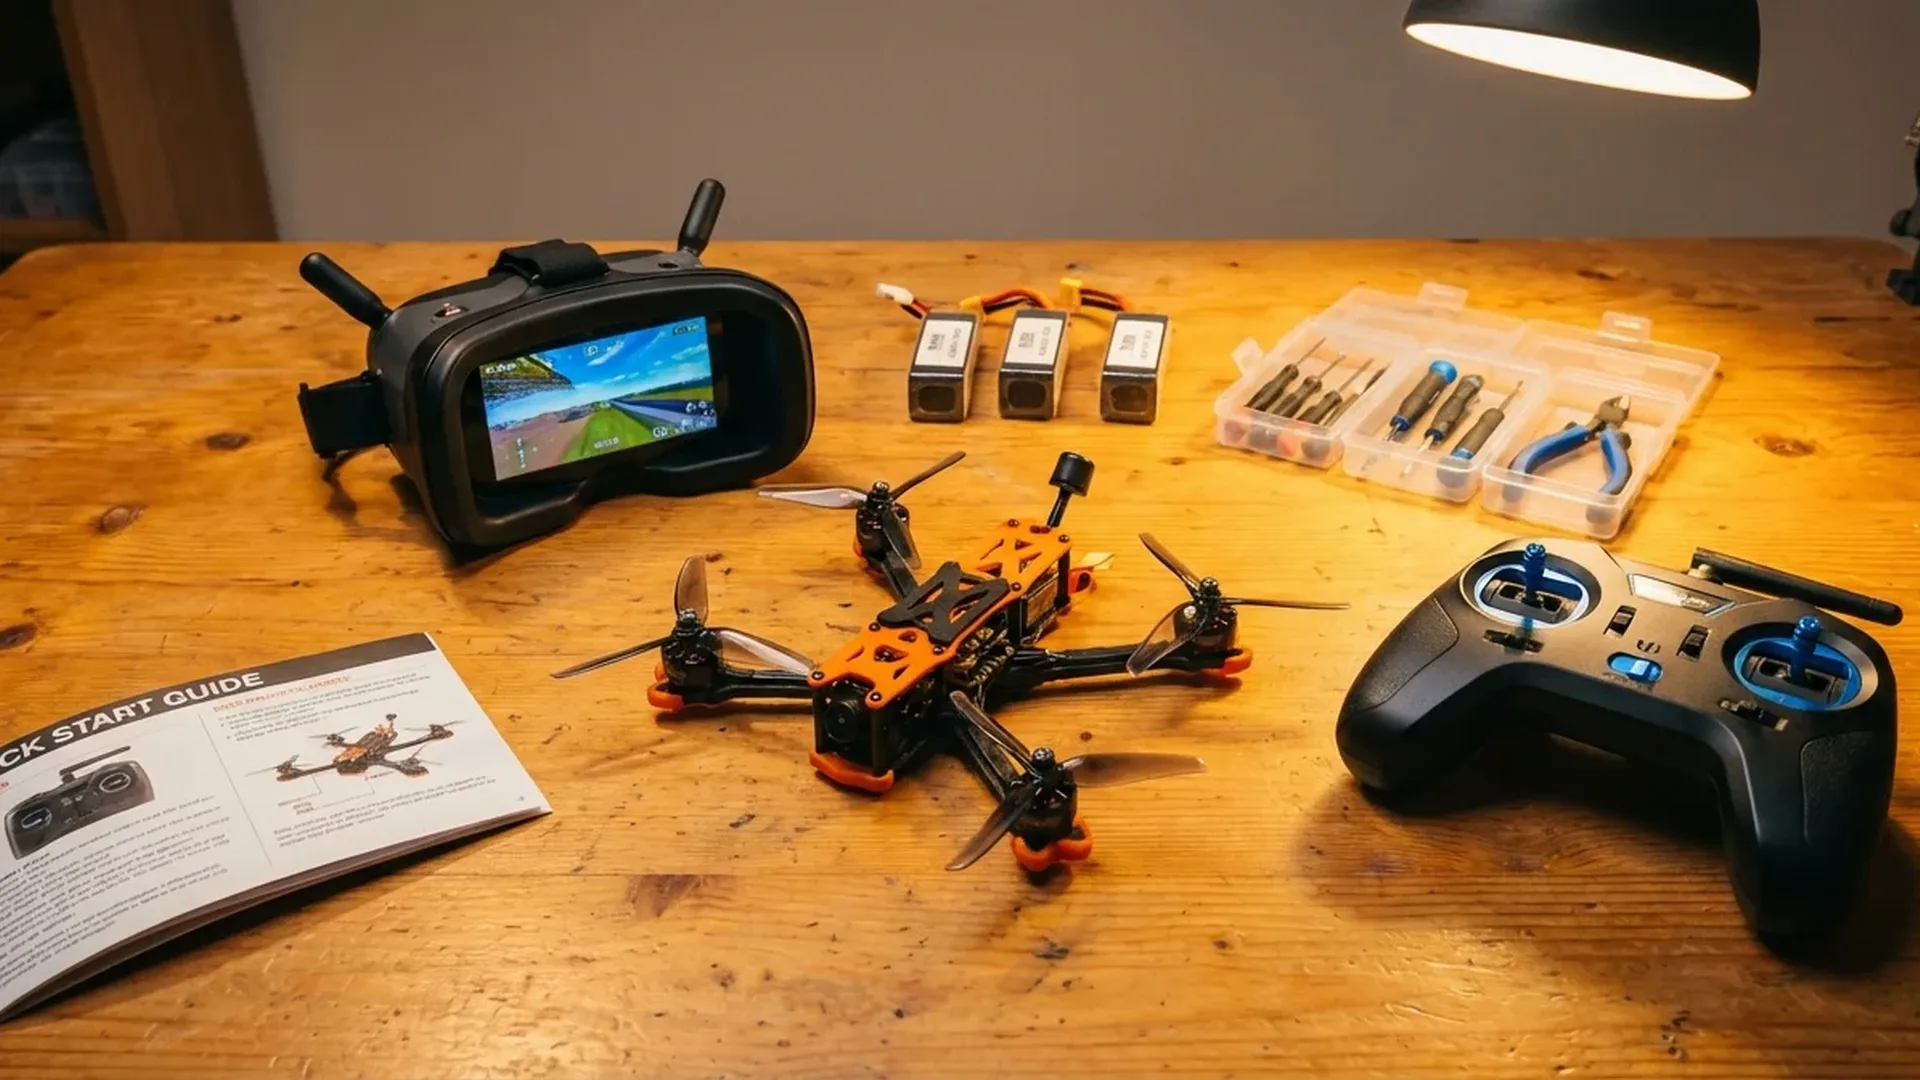
To get started with FPV, you need four essential pieces of equipment. Let's look at each one in detail:
1. The FPV Drone
FPV drones are categorized by their size, measured in inches (referring to the frame diagonal). The most popular sizes:
- Micro/Whoop (65-75mm): Very small, lightweight, ideal for indoor flying. Examples: BetaFPV Meteor75, EMAX Tinyhawk III. Cost: approximately €40-120 (~$43-130).
- Toothpick/Cinewhoop (2.5-3.5″): Medium-sized, suitable for outdoor flying with a bit more power. Can carry a small action camera. Cost: approximately €100-250 (~$108-270).
- 5″ Freestyle/Racing: The “classic” FPV drone size. Powerful, fast, capable of freestyle acrobatics and racing. Cost: €150-400 (~$162-432) ready-to-fly, or €100-300 (~$108-324) as a kit for self-assembly.
- 7″ Long Range: Larger, designed for long-distance and cinematic flights. Cost: €250-500+ (~$270-540+).
Tip for beginners: Start with a micro/whoop drone. They're cheap, crash-resistant, and you can practice indoors without risk. If you want something more “ready to go,” kits like the BetaFPV Cetus Pro include a drone, goggles, and controller in one package.
2. FPV Goggles
FPV goggles are what make the experience unique. There are two categories:
- Analog Goggles: Cheaper (€30-100 / ~$32-108), lower image quality but near-zero latency. Popular models: Eachine EV800D, Skyzone Cobra X. Ideal for whoop/micro drones.
- Digital Goggles: More expensive but with HD image quality. The two dominant systems are DJI O4 (DJI Goggles 3) and HDZero/Walksnail Avatar. In Greece, DJI Goggles 3 are primarily sold as part of the DJI Avata 2 combo.
The DJI Goggles 3 stand out thanks to their micro-OLED display, 1080p resolution, and the Real-View PiP (Picture-in-Picture) feature that lets you see your surroundings without taking them off. Transmission latency drops to just 24 ms at 1080p/100fps — impressively low for a digital system.
3. Controller (Radio Controller)
The controller is your “hands” in the air. For beginner FPV pilots, there are two options:
- Motion Controller (e.g., DJI RC Motion 3): Easy to use — you tilt your hand and the drone turns. Suitable for cinematic FPV but limited for freestyle/acro. Included with the DJI Avata 2 Fly More Combo.
- Traditional Radio TX (e.g., RadioMaster Boxer, TBS Tango 2): Two sticks for full control — throttle, yaw, pitch, roll. Essential for freestyle and racing. Popular protocol: ELRS (ExpressLRS). Cost: €80-200 (~$86-216) for a good beginner radio.
"In FPV, the controller is the most important investment. A good radio TX will be with you for years, even if you change many drones. Don't put your money into a cheap controller — you'll regret it." — Common advice in the FPV community
4. Batteries and Charger
FPV drones use LiPo (Lithium Polymer) batteries, measured in “cells” (S). A whoop uses 1S, a 5″ freestyle uses 4S or 6S. You'll need at least 3-4 batteries (each flight lasts 3-7 minutes) plus a reliable charger (e.g., ISDT D2 Mark II, ToolkitRC M6). Battery cost: €8-30 (~$9-32) each depending on size. Charger: €40-80 (~$43-86).
LiPo safety warning: LiPo batteries can be dangerous if mishandled. Always charge in a LiPo-safe bag, never leave them fully depleted, and store them at storage voltage (~3.85V/cell). Never charge them unattended.
The 5 Steps to Get Started
Simulator first!
Download an FPV simulator (Velocidrone, Liftoff, Uncrashed, or the free DJI Virtual Flight) and practice at least 10-20 hours before flying a real drone. You'll learn the basics without breaking anything.
Buy the basic equipment
Start with a beginner kit or a whoop + analog goggles + radio TX. Don't spend more than €300-400 (~$324-432) on your first setup — learn first, upgrade later.
Learn Acro Mode gradually
Start in Angle/Horizon mode (stabilized flight) and transition gradually to Acro (manual). In Acro, the drone doesn't self-level — you must control everything. This is the “real” FPV experience.
Fly in a safe area
Find an open field or park away from people. FPV drones have no obstacle avoidance — if they hit something, they break. Start low and slow, familiarize yourself with the space.
Join the community
Follow FPV channels on YouTube (Joshua Bardwell, Mr Steele, Rotor Riot), join FPV groups on Facebook, and if there's an FPV club near you, visit it. The community is amazing and eager to help.
The Importance of Simulators
If there's ONE thing experienced FPV pilots agree on, it's this: don't fly a real drone before putting in enough simulator hours. The reason is simple — a crash in a simulator costs nothing, but a crash in reality can cost you €50-200 (~$54-216) in replacement parts.
The most popular FPV simulators:
- Velocidrone — Considered the most realistic. Cost approximately €18 (~$19) one-time. Ideal for freestyle and racing.
- Liftoff — Equally good, with a more user-friendly interface. Available on Steam, approximately €20 (~$22).
- Uncrashed — Newer, with impressive graphics. Free (early access). Ideal for freestyle.
- DJI Virtual Flight — Free app from DJI. Limited to DJI ecosystems but ideal if you're considering the DJI Avata 2.
Pro tip: You can connect a real radio TX (e.g., RadioMaster Boxer) to your computer via USB and practice on the simulator with the same sticks you'll use on your real drone. This makes a massive difference in building muscle memory.
How Much Does It Cost to Start FPV?
One of the most important questions. Let's look at three budget scenarios:
Budget Entry (~€150-250 / ~$162-270)
| Equipment | Example | Price (EU) |
|---|---|---|
| All-in-One Kit | BetaFPV Cetus Pro Kit (drone + goggles + controller) | ~€150-180 (~$162-194) |
| Extra batteries (x3) | 1S 450mAh LiPo | ~€20-30 (~$22-32) |
| FPV Simulator | Velocidrone or Liftoff | ~€18-20 (~$19-22) |
| Total | ~€190-230 (~$205-248) | |
With this budget you get a complete set to learn the basics indoors and in small outdoor spaces. The image quality from analog goggles won't impress you, but it's more than sufficient for learning.
Mid-Range DJI Route (~€874-1,100 / ~$944-1,188)
| Equipment | Example | Price (EU) |
|---|---|---|
| DJI Avata 2 FMC Single Battery | Drone + DJI Goggles 3 + RC Motion 3 | €874 (~$944) |
| Extra battery + Charging Hub | DJI Avata 2 Battery + Hub | ~€100-130 (~$108-140) |
| DJI Care Refresh (optional) | 1-year crash protection | ~€80 (~$86) |
| Total | ~€1,050-1,100 (~$1,134-1,188) | |
This option is the most popular for beginners who want a premium experience without technical complexities. The DJI Avata 2 is essentially “FPV out of the box” — unbox, connect the goggles, and fly. The 1/1.3″ sensor with 4K/60fps HDR delivers excellent image quality, the built-in propeller guards reduce crash damage, and it weighs only 377 grams (C1 class in the EU). Transmission range reaches 10 km in Europe (CE) via the O4 system.
The DJI Avata 2 Drone Only costs €417 (~$450) on Skroutz if you already have DJI Goggles 3 and a controller. There's also the Pro-View Combo (with FPV Remote Controller 3 instead of RC Motion 3) at approximately €1,467 (~$1,584) for those who want full FPV stick control.
Serious FPV Build (~€500-800 / ~$540-864)
| Equipment | Example | Price (EU) |
|---|---|---|
| Radio TX | RadioMaster Boxer (ELRS) | ~€100-130 (~$108-140) |
| FPV Goggles | Skyzone Cobra X / Eachine EV800D | ~€50-120 (~$54-130) |
| 5″ Freestyle Drone (BNF) | iFlight Nazgul ECO V2 / TBS Source One build | ~€150-250 (~$162-270) |
| Batteries 4S/6S (x4) | CNHL, Tattu 1300-1500mAh | ~€60-100 (~$65-108) |
| Charger | ToolkitRC M6 / ISDT D2 | ~€50-80 (~$54-86) |
| Spare parts & Tools | Props, soldering iron, strap, XT60 | ~€30-50 (~$32-54) |
| Total | ~€440-730 (~$475-788) | |
This route is the more “authentic” FPV path — you build (or buy a ready-made BNF) a 5″ drone, learn its internals, and fly in full manual mode. The learning curve is steeper but the freedom is unlimited. You can do whatever you want — flips, rolls, power loops, dives, split-S — with no software limitations whatsoever.
DJI Avata 2 vs Custom FPV Build
This is the big question every beginner asks. Let's look at the pros and cons:
DJI Avata 2 — Pros
- ✅ Plug & play — flying in 10 minutes
- ✅ Excellent image quality (4K HDR)
- ✅ Built-in stabilization (RockSteady)
- ✅ Prop guards = fewer crashes
- ✅ Turtle Mode if it lands upside down
- ✅ Easy Acro mode for smooth transition
- ✅ Warranty & DJI Care Refresh
DJI Avata 2 — Cons
- ❌ Closed DJI ecosystem
- ❌ Less power/speed (19 m/s max EU)
- ❌ Can't do “true” acro
- ❌ More expensive spare parts
- ❌ 23-minute flight time (vs ~4 min freestyle)
- ❌ You don't learn building/tuning
- ❌ Less customizable
Custom FPV Build — Pros
- ✅ Full freedom in control & customization
- ✅ Greater power and speed
- ✅ You truly learn how it works
- ✅ Cheaper spare parts
- ✅ You can build/modify everything
- ✅ Enormous variety of equipment
- ✅ Open protocols (ELRS, Betaflight)
Custom FPV Build — Cons
- ❌ Steeper learning curve
- ❌ Soldering skills required
- ❌ More time for setup and tuning
- ❌ Worse on-board camera (needs a GoPro)
- ❌ More crashes at the beginning
- ❌ No warranty/support
- ❌ More complex configuration
"If you want to fly FPV as a smooth cinematic tool, get the DJI Avata 2. If you want to feel what FPV truly means — spins, flips, dives, adrenaline — then build a custom 5″ quad. Ideally, at some point, you'll do both."
FPV Regulations in Greece & the EU
FPV flying in Greece is subject to EASA regulations (Open Category) and national rules from the Hellenic Civil Aviation Authority (HCAA):
- Pilot Registration: Mandatory registration with the HCAA for every drone operator flying drones over 250g (or with a camera). This applies to FPV drones as well.
- C Class: Most FPV drones fall under the A1/A3 subcategory depending on weight. The DJI Avata 2 (377g, C1) can fly near people under the A1 subcategory.
- Visual Observer: Under EASA regulations, during FPV flight there must be a “visual observer” (spotter) — a person who can see the drone with the naked eye and warn you about hazards.
- Maximum Altitude: 120 meters AGL (Above Ground Level).
- No-Fly Zones: Do not fly near airports, military installations, or densely populated areas (unless exemptions apply).
The spotter rule: Many beginner FPV pilots ignore this rule. In practice, if you fly in an open field alone, you're technically violating the regulation. Always bring someone with you — besides being a rule, it's also a safety concern.
Essential FPV Terminology
Before joining the community, learn these fundamental terms:
- Acro Mode (Manual Mode): The pilot fully controls tilt — the drone doesn't self-level. “True” FPV.
- Angle Mode: Stabilized flight — release the sticks and the drone returns to level. Ideal for beginners.
- Throttle: Left stick (up/down) — controls motor power/speed.
- Yaw: Left stick (left/right) — rotation left/right around the vertical axis.
- Pitch: Right stick (up/down) — tilt forward/backward.
- Roll: Right stick (left/right) — tilt left/right.
- BNF (Bind-N-Fly): Drone ready to go — just needs binding with your controller & goggles.
- PNP (Plug-N-Play): No receiver included — requires receiver installation.
- Betaflight: The firmware that runs on most custom FPV drones. Open source.
- PID Tuning: Adjusting flight parameters (Proportional, Integral, Derivative) — affects how responsive/smooth the flight feels.
- ELRS (ExpressLRS): Open-source control protocol, very popular — low latency, long range.
- VTX (Video Transmitter): The video transmitter on the drone that sends the image feed to your goggles.
Common Beginner Mistakes
Almost every new FPV pilot makes some of these mistakes. Learn from the mistakes of others:
- Buying an expensive drone first: Don't get a 5″ quad as your first FPV drone. You will crash it, many times. Get something cheap or fly simulator first.
- Skipping the simulator: 10-20 hours of simulator time saves hundreds of euros in spare parts. Don't skip it.
- Flying too high/fast too soon: In your first flights, stay at 2-3 meters altitude. Learn to hover first, then move.
- Ignoring battery safety: Don't run your LiPo down to empty — land if you see below 3.5V/cell. A puffed battery = needs to be disposed of properly.
- Not bringing spare parts: Always carry extra props, zip ties, and electrical tape. Crashes are inevitable.
Final Thoughts
FPV flying is one of the most addictive hobbies you can pick up. The feeling of freedom when you fly through trees, over mountains, or nail a perfect power loop is something that's hard to describe — you have to experience it yourself.
Our recommendation: if you're completely new, start with a simulator + a cheap whoop kit (~€200 / ~$216). If you want a “premium FPV experience without the headache,” get the DJI Avata 2 Fly More Combo at €874 (~$944). And if you already know this is what you want in your life (hooked after YouTube videos), then dive straight into a 5″ build — you won't regret it.
Whatever you choose, remember: every FPV pilot was once a beginner. Your first 10 flights will be awkward. After 50, you'll start feeling comfortable. And after 200… you'll be looking for new ways to impress even yourself.
Happy flying!
Frequently Asked Questions (FAQ)
How difficult is it to learn FPV?
Harder than a traditional GPS drone, but easier than you think. With 15-20 hours of simulator time and 20-30 real flights, you'll be able to fly comfortably in Acro mode. For freestyle aerobatics, you'll need a few months of regular practice.
Do I need a drone license for FPV in Greece?
Yes, you need to register with the HCAA (Hellenic Civil Aviation Authority) and complete online training for the Open category (A1/A3). The process is free and can be completed online in 1-2 hours.
Can I fly FPV alone?
Technically, EASA regulations require a visual observer (spotter) during FPV flight. In practice, if you fly in an isolated area, many pilots fly solo, but this isn't strictly legal. It's better to bring someone along.
Which DJI Avata 2 combo should I buy?
If you want cinematic FPV without complexity, get the Fly More Combo Single Battery (€874 / ~$944) with RC Motion 3. If you want a more “authentic” FPV control experience, get the Pro-View Combo (~€1,467 / ~$1,584) which includes the FPV Remote Controller 3 with sticks. The Drone Only (€417 / ~$450) is worth it only if you already own DJI goggles and a controller.
How much do spare parts cost?
For custom FPV quads, props cost €2-5 (~$2-5) per pack, a motor €10-25 (~$11-27), and a frame €20-40 (~$22-43). For the DJI Avata 2, props cost approximately €8-12 (~$9-13) per pair, while major damage (gimbal, frame) can cost €50-150+ (~$54-162+). That's why DJI Care Refresh (~€80/year / ~$86/year) is almost always worth it.